
Never played before?
A step-by-step guide for people who have never played MapleStory, or who skipped the tutorial and now don't know what to do.
This page assumes you know nothing about MapleStory. It covers what to do, where the buttons are, how to get and use your skills, and how to recover if you skipped the tutorial or a quest gets stuck. If you've played before, Start here is shorter.
In a hurry? The three things new players miss most: spend your skill points (Skills), spend your ability points (Stats), and put your attack skill on a key. Do those three and you'll be fine.
What you actually do in this game#
MapleStory comes down to one loop:
- Fight monsters. They give you EXP and drop mesos (money) and items.
- Level up. Every level gives you skill points (SP) and ability points (AP) to spend.
- Advance your job at levels 10, 30, 60, 100 and 200. Each advancement unlocks a new set of skills.
- Get better gear, then fight harder monsters and eventually bosses.
Quests, the story, shops and the other systems all feed into that loop. If you're fighting monsters that give decent EXP and aren't killing you, you're making progress.
Your screen#
- Bottom of the screen: your level, HP (your health), MP (your mana for skills) and the EXP bar. When the EXP bar fills, you level up.
- Bottom right: the quick slots where you put skills and potions, and the menu buttons.
- Left side: icons for quests you can take or are doing.
- Top left: the minimap of the map you're on.
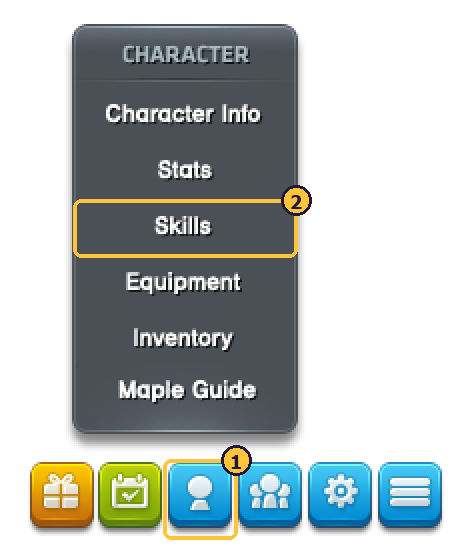
Every window in the game can also be opened from the menu buttons. If you forget a key, click the Character button (the person icon). It lists Stats, Skills, Equipment and Inventory.
Controls#
These are the default keys. You can change any of them in the keyboard settings, reached from the menu buttons at the bottom right.
| Key | What it does |
|---|---|
| ← → | Walk |
| ↑ ↓ | Climb ropes and ladders. ↑ also goes through portals |
| Alt | Jump. ↓ + Alt drops down through a platform |
| Ctrl or your skill keys | Attack |
| Z | Pick up items |
| Enter | Open the chat box |
| I | Inventory |
| E | Equipment you're wearing |
| S | Stats |
| K | Skills |
| Q | Quest log |
| W | World map |
Talk to NPCs by double-clicking them. Portals are the glowing swirls at the edge of a map. Stand on one and press ↑ to go to the next map.
Your first ten minutes#
- Create a character. Pick whichever class looks fun. Choosing a class can help, but every class can reach the endgame.
- Play the tutorial if you can. It's short, gives you starter gear and usually your 1st job. If you already skipped it, see Skipped the tutorial? below.
- Spend your points. As soon as you have SP, open the skill window and learn your attack skill. See the next section.
- Put your attack skill on a key, then go and hit some monsters.
Skills: how to get them and use them#
You don't get skills for free. You buy them with skill points (SP). When you get a job advancement, all of that job's skills show up in your skill window at level 0. A skill at level 0 is greyed out and can't be used. It only works after you put at least one point into it.
You get SP from your job advancement and a few more every time you level up. Unspent SP does nothing, so spend it right away.
Learning a skill#
- Open the skill window with K, or Character → Skills.
- Click the tab for your job advancement (1). The tabs are ● for beginner skills, then I, II, III, IV, V for your 1st to 5th job. Your newest skills are always on the highest tab you've unlocked.
- The Skill Points box (2) shows how many points you have for that tab.
- Press the green + next to a skill (3) to put a point in. The icon turns from grey to colour once the skill is learned.
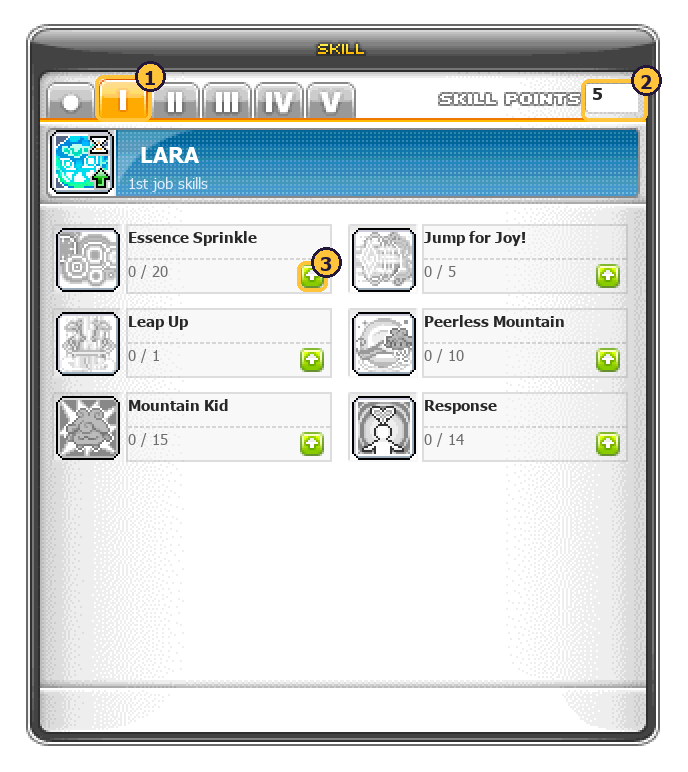
Points belong to a tab. SP you earn during your 1st job can only go into tab I, SP from your 2nd job only into tab II, and so on. If the Skill Points box says 0, check the other tabs.
Which skills first#
Hover over a skill to read what it does. A simple order that works for every class:
- Your main attack skill. Its description says something like "attack enemies" or "deals damage". Learn it first and keep raising it.
- Passive skills that add damage, attack, critical rate or stats. Passives work automatically. You never press them.
- Movement skills (double jumps, teleports, up-jumps). They make training much faster.
- Buffs (skills that last a while after you press them). Press them once before you fight.
Not sure? Put everything into the attack skill first. You can't really go wrong at low level.
Putting skills on your keys#
A learned skill still needs a key. Drag the skill's icon out of the skill window and drop it on one of the quick slots at the bottom right of your screen (1). The key shown on that slot now uses the skill. Do the same with potions from your Use tab (2), so you can drink one with a single key.
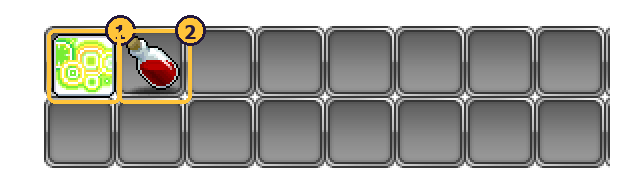
You can also drop skills onto any key in the keyboard settings window. Passive skills can't go on keys and don't need to.
Skill problems#
- The + button is grey. You have no SP left for that tab, the skill is already at its maximum, or it needs another skill first. Hover over it to see why.
- I pressed the key and nothing happened. Make sure the skill is at level 1 or more, you have enough MP, and it's not on cooldown. Then type
@check, which unsticks most skill problems. - I have no skills at all on tab I. You haven't done your 1st job yet. See the section on skipping the tutorial.
Later on you'll also get Hyper Skills (level 140) and the 5th job's V Matrix (level 200).
Stats: ability points#
Every level gives you 5 ability points (AP). They raise your main stat, which raises your damage.
- Open the stat window with S, or Character → Stats.
- The Ability Point box (1) shows how many you have waiting.
- Press Auto-Assign (2). The game puts every point where your class needs it.
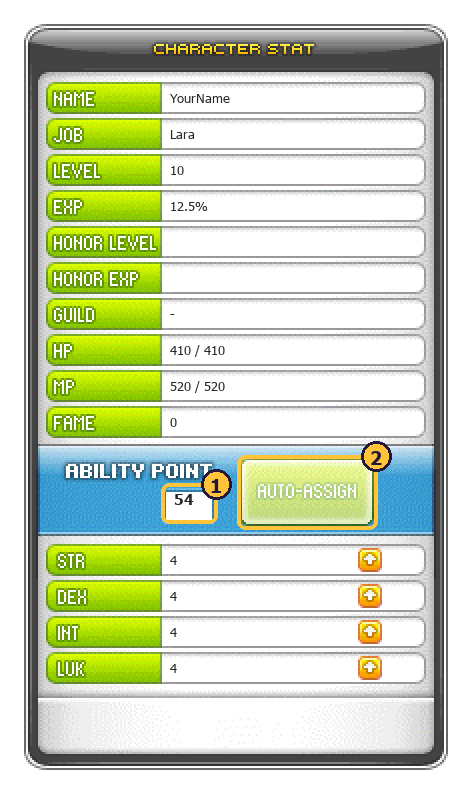
That's all you need. You can also press the small + next to a stat to add points by hand. Most classes want one main stat (STR, DEX, INT or LUK). Auto-Assign already knows which one.
Skipped the tutorial?#
Many classes offer to skip the tutorial when you start. Skipping jumps you to level 10 and a town, but you miss the part where the game explains things, and a few classes don't have their 1st job yet. Here's how to catch up.
Step 1: check whether you have your 1st job#
Open the skill window (K) and click tab I.
- Tab I has skills in it: you have your 1st job. Spend your SP (Skills) and your AP (Stats), put your attack skill on a key and start training. Most players who "don't know what to do" after skipping are simply here with unspent points.
- Tab I is empty or locked: you don't have your 1st job yet. Keep reading.
Step 2: get your 1st job#
Explorers (Warrior, Magician, Bowman, Thief, Pirate) who skip arrive in Lith Harbor as a level-10 Beginner. Go to the job instructor for the class you want and talk to them. They'll make you that class on the spot.
| Class | Instructor | Where |
|---|---|---|
| Warrior |  Dances with Balrog Dances with Balrog |
Perion, Warriors' Sanctuary |
| Magician |  Grendel the Really Old Grendel the Really Old |
Ellinia, Magic Library |
| Bowman |  Athena Pierce Athena Pierce |
Henesys, Bowman Instructional School |
| Thief |  Dark Lord Dark Lord |
Kerning City, Hideout |
| Pirate |  Kyrin Kyrin |
Nautilus, Navigation Room |
All five towns are on Victoria Island, the same island as Lith Harbor. Walk there through the portals, or use the taxi NPC in town. Press W for the world map at any time to see where you are.
Other classes land in their own home town or area when they skip:
| Class | Where you land | 1st job? |
|---|---|---|
| Pathfinder, Cadena, Illium | Henesys | Yes |
| Dual Blade | Kerning City | Yes |
| Evan, Mercedes, Phantom, Luminous, Shade, Mihile, Demon Slayer / Avenger | Their home area | Yes |
| Hayato, Kanna | Zipangu | Given when you arrive |
| Lara | Henesys (there's no full tutorial on Eden yet) | Yes |
| Cygnus Knights | Ereve | No: take the lightbulb quest in Ereve |
| Aran | Rien | No: take the lightbulb quest in Rien |
| Resistance | Secret Plaza | No: take the lightbulb quest from your class's instructor |
| Cannoneer, Ark | The end of their intro area | No: follow the lightbulb quests |
Classes that aren't listed have no skip option: play through their intro. If your class says No, look at the left side of your screen for a  lightbulb icon and follow it. The quest points you to the NPC who gives your 1st job.
Still no 1st job? If you can't find the quest, or the NPC doesn't give you the job, stop there and ask on Discord. Tell us your character name and class. Staff can give you the job directly. Don't keep levelling as a Beginner: you'd be missing all your skill points.
Step 3: know where to train#
After your 1st job, hunt monsters close to your level. The training-spot finder lists the best maps for your exact level, using Eden's own monster data. Your first day (Lv. 1 – 30) has a route from level 10 to 30.
Quests#
Quests give EXP, gear, potions and your job advancements. You can tell what an NPC wants from the icon above its head, and the same icons appear on the left side of your screen:
| Icon | Meaning |
|---|---|
|
A new quest you can take |
 |
A quest you're doing |
 |
Ready to hand in: go back to the NPC |
Open the quest log with Q to see every quest you've started. Select one to see what it wants, and which NPC to talk to on which map.
You don't have to do every quest. On Eden, most of your levels come from monsters at x7 EXP. Do quests that are quick or give good rewards, and always do your job advancement quests.
A good routine#
Once you have your 1st job, most sessions look like this:
- Spend new SP and AP every time you level up.
- Take the quests near you that fit your level.
- Pick a map with monsters around your level and hunt. Move on when they stop giving good EXP.
- Keep potions in your Use tab and on a key. Buy more from any potion shop in town.
- Sell junk with
@sellwhen your inventory fills up. - Watch for job advancements at 30, 60, 100 and 200. A quest pops up on the left when you reach the level.
When you have somewhere else to be, type @ac and Auto Battle (@ac) keeps fighting for you.
When a quest is stuck or broken#
Eden is a custom server, so some quests don't work the way they should. We fix them as players report them, but you may run into one before we do. The usual signs:
- The NPC says nothing useful, or the same line again and again.
- You finished what the quest asked for, but you can't hand it in.
- A dialogue box or cutscene doesn't close, and you can't move or attack.
- The quest sends you somewhere that doesn't exist or can't be reached.
Work through these steps in order. Most problems are gone by step 3.
- Type
@check. It closes stuck dialogues and frees your character. This is the fix for "I can't move" and "my skills stopped working". - Talk to the NPC again. Open the quest log (Q) to check which NPC finishes the quest and on which map. Sometimes the second try works.
- Log out and back in. Your character saves automatically, so you won't lose anything. This clears a lot of odd states.
- Give up the quest and take it again. In the quest log, select the quest and give it up, then accept it again from the NPC. You may lose the quest's items and have to collect them again.
- Arcane River quests (level 200+): type
@fixquest. It repairs the Arcane River quests we know get stuck. - Skip it. Most quests are optional. Go train and come back later. It may be fixed by then.
Job advancement quests are not optional. If your 1st, 2nd, 3rd, 4th or 5th job quest won't start or won't finish, don't just skip it. Tell us on Discord and staff will sort it out.
Reporting a broken quest#
A good report gets fixed fast. Post on Discord with:
- your character name, class and level,
- the quest name exactly as it appears in the quest log,
- the NPC you were talking to and what happened,
- a screenshot of the quest log or the chat, if you can.
Please don't delete your character because a quest broke. Staff can almost always fix it without that, and your progress stays.
Words you'll hear#
| Word | Meaning |
|---|---|
| EXP | Experience. Fill the bar at the bottom to level up. |
| SP | Skill points. Spend them in the skill window to learn and raise skills. |
| AP | Ability points. Spend them in the stat window, or press Auto-Assign. |
| Mesos | The in-game money. |
| NX | Cash Shop currency, for outfits, pets and convenience items. You earn it by hunting and voting. |
| HP / MP | Health and mana. If HP hits zero you die and go back to town. |
| Job advancement | A class upgrade at 10, 30, 60, 100 and 200 that unlocks new skills. |
| Passive skill | A skill that works on its own once learned. It never goes on a key. |
| Buff | A skill that boosts you for a while after you press it. |
| Mobbing / bossing | Killing lots of normal monsters / fighting one big boss. |
| Burning map | A map nobody has hunted lately gives bonus EXP. See Rates, burning maps & NX. |
| Rune | A glowing stone that appears on maps. Touch it and press the arrows shown for a buff. See Runes. |
| Link skill | A bonus one of your characters gives to your other characters. |
Where to go next#
- Your first day (Lv. 1 – 30): the route from level 10 to 30.
- Choosing a class: what each class is like.
- Player commands: every
@command. - Troubleshooting: fixes for the launcher, crashes and lag.
- Discord: ask anything. Nobody minds beginner questions.
Something wrong or missing? Tell us on Discord.